Tuesday, April 16, 2019

Azure SQL Managed Instance

Azure SQL managed instance is a relatively new Azure offering. It has nearly 100% feature compatibility with the latest on-premises SQL Server Enterprise Edition Database Engine and allows relatively easy lift and shift of on-premises applications to the cloud with minimal application and database changes. At the same time, Platform as a service capabilities such as automatic patching, version updates, backups, and high-availability drastically reduce required management overhead and total cost of ownership.

For customers running older versions of SQL Server, I'm happy to report that the Azure SQL managed instance supports backward compatibility to SQL 2008 databases. It supports direct migration from SQL 2005 database servers, however migrated SQL 2005 databases will have their compatibility level updated to SQL 2008.

A great benefit of choosing the managed instance deployment option is that it will always be up-to-date because patches and upgrades are automatically applied. Also, you don't have to purchase, manage or secure physical hardware.

Managed instance has High-availability built in and pre-configured using a technology similar to Always On Availability Groups, providing 99.99% uptime SLA. It also has automated backups and point in time restore.

With the managed instance you will spend less time on administrative tasks because the service either performs these tasks automatically for you or greatly simplifies them.

It supports Azure AD authentication as cloud alternative to Windows authentication, automatically manages XTP filegroup and files for databases containing In-Memory OLTP objects and supports SQL Server Integration Services (SSIS) and can host the SSIS catalog (SSISDB) that stores the packages. SSIS packages must be executed on a managed Azure-SSIS Integration Runtime (IR) in Azure Data Factory (ADF). Unlike Azure SQL Database, it allows cross-database queries.

There are two service tiers for Managed Instance: General Purpose and Business Critical.

General purpose: Designed for applications with typical performance and IO latency requirements.
Business critical: Designed for applications with low IO latency requirements and minimal impact of underlying maintenance operations on the workload.

Server sizes range from 8 to 80 vCores depending upon service tier. Memory is 7 GB per vCore.
Maximum storage is 8 TB for general purpose and up to 4 TB for Business Critical

NEW Stuff in Azure SQL Managed Instance!

As of 11 April 2019, managed instance now has a public endpoint. (YAY!)
Here's a link to the official Microsoft article on it - with full instructions for implementing it via Powershell

Friday, April 12, 2019

Azure Data Studio - now with Notebooks


Azure Data Studio is a light-weight cross-platform database tool based upon Visual Studio Code. It runs on Windows, Mac, and Linux. It includes a SQL editor with IntelliSense, keyword completion, code snippets, code navigation and Git source control integration. Although SQL Server Management Studio still remains the champion for database administration tasks, I believe that for developers and Mac and Linux users, Azure Data Studio is the best choice. I also like the fact that Azure Data Studio uses far fewer resources on my machine than SSMS.

As of March 2019, Azure Data Studio connects to:

  • SQL server 2014+
  • Azure SQL database
  • Azure SQL Data Warehouse
  • Azure SQL Managed Instance
  • PostgreSQL servers 

One of the newest and I think more notable features that has been added to Azure Data is its ability to create a SQL notebook.

Notebooks are type of document that combine formatted text with live code elements, images, and query results. You may have heard of them as "Python Jupyter Notebooks". Well, now they can be used with SQL in addition to other programming languages such as Python, Scala, and R.

To create a notebook, simply open Azure Data Studio, then select New Notebook from the file menu. Add a code type cell (or section), check that the Kernel is "SQL", set the connection to your favorite database, enter some SQL code and execute it.

The IntelliSense in Azure Data Studio simplifies code entry, and the right-click menu offers some excellent options, including formatting the document, changing all occurrences of the selected word, and taking a "Peek" at the definition of the selected SQL object (table or stored procedure name).


Just think of all the possibilities!

These notebooks will be great for technical presentations. I can prepare formatted text to describe the concepts presented in my session, and include executable code within the context of the document which the attendees can run at home on their own systems after they download the demos.

Another great scenario would be for troubleshooting or baselining a server. Because Notebooks allow you to save the query results inside the file, you can run diagnostic queries and save the results all in one neat package. Then, later on when you wish to compare to the original baseline, make a copy of the notebook, clear the results and re-run all the queries to see the differences.

For problem solving,  you could create a Notebook containing instructions and a series of queries, ask your client to run the queries and return it to you with the results populated.

I think these new features really make Azure Data Studio outshine old SSMS. I may not remove SSMS from my machine just yet, but I'm pretty certain it's not going to see very much use in the future.

Monday, April 8, 2019

I'm Speaking at Phoenix SQL Saturday!

Just a quick post to let you know that I'll be speaking at the Phoenix SQL Saturday on May 4, 2019.

SQLSaturday is a free training event for Microsoft Data Platform professionals and those wanting to learn about SQL Server, Business Intelligence and Analytics. This event will be held on May 04 2019 at Chandler-Gilbert Community College Pecos Campus, 2626 East Pecos Road, Chandler, Arizona, 85225, United States

Hope to see you there!!


Shoe lovers: I'm a DSW ambassador, so please use this link when going to DSW Shoes

Meet Azure Key Vault

What is Azure Key Vault? Azure Key Vault is a cloud hosted service offering secure storage and access for certificates, encryption keys, connection strings and other secrets. It streamlines the key management process and provides full control of keys for accessing and encrypting your data. Administrators can grant and revoke access to keys as needed. Key vaults also control the access to anything stored within them.

Applications and Azure resources authenticate to Key Vault to retrieve the secrets. The best authentication method for Azure services is to use a managed identity because it allows Azure services to authenticate to Key Vault or any service that supports Azure AD authentication, without having to include credentials in your code. With Azure Key Vault, applications never have direct access to keys.

Administrators can monitor and audit key use with Azure logging.

Key vault allows the separation of security maintenance from application development. For example, Key Vault secrets can be used to store connection strings for various resources accessed by ADF. Those connection strings can be updated by Administrators without affecting the ADF pipelines or having to send the new passwords out to developers.

It only takes a minute or two to create a Key Vault. In the Azure Portal, click on the Create a Resource, search for Key Vault, then click create.


Next, provide a name for the Key Vault, select subscription, resource group and location. Finally, select pricing tier.  Refer to https://azure.microsoft.com/en-us/pricing/details/key-vault/ for details on current pricing. Most users will select standard tier unless their security policy requires the premium features.

Once the key vault has been created keys, secrets, and certificates may be imported or manually created.

To create a secret, click on "Secrets", then Generate/Import.


This will open the "create a secret" dialog. Choose a name for the secret, such as dev-Adventureworks-Connection for the connection string for Adventureworks database in Development environment. Enter the full connection string in the Value field, write a brief description of the secret in the content type box and click "Create" to complete the creation process.

Once you have created your key vault and some secrets or keys, they may be used in any Azure resource which has been granted access to the Azure Key Vault. That will be covered in another post.

Thursday, May 24, 2018

Power BI: M Query Basics (Part 2)

This is the second part of my series on Power BI M Query Basics. In Part 1, I defined M Query and talked about the structure of how an M Query query is written. If you haven't read the first part, go ahead and read it now....I'll wait.


OK, on to

M Query - the Second Part!


M Query Editor


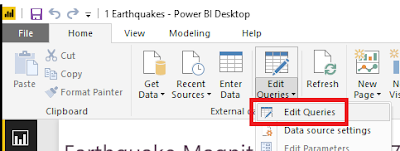
Open up a Power BI report in Power BI desktop. On the Home ribbon, click on the Edit Queries > Edit Queries to open up the Query Editor.


In Query Editor, you can get to the M Query behind one of your queries by clicking on Advanced Editor either on the Home tab or on the View tab of the editor. (it's available in both locations)


Once you have Advanced Editor open, you can edit the M Query associated to the selected query.
The first thing that you will notice about the built-in M Query editor is that it doesn't have any context highlighting, matching brackets are not highlighted, and syntax errors are extremely difficult to track down. Editing M query in here is not for the faint of heart - most of us are very thankful that the Query Editor user interface can auto-generate about 90% of all of the M Query code that will be needed.

Thankfully, it's not the only option. 

M Extension for Notepad++

 
First up is the M Extension for Notepad++. I'm a big fan of Notepad++. It's lightweight, loads fast, and has context highlighting available for most programming languages. The official plug-in page for Notepad++ doesn't yet have a link for a fully completed extension, but you can visit Lars Schreiber's blog for instructions to set up your own M language highlighting (you only have to do it once, then it's there forever as a language choice in Notepad++).

The above screenshot shows the same "May Earthquakes" M Query except within Notepad++. Already you can see that pasting your M Query into Notepad++ makes it so much easier to understand and edit. 

M Extension for Visual Studio Code

 
A second editor to try for working with M Query is Visual Studio Code. This is a free application available from the Visual Studio Code site. Once you've installed Visual Studio Code, click on the Extensions button and perform a search for Power (full name is Power Query M Language).
Hit install and it will be ready for use. What's really lovely about Visual Studio Code is that the M Query Extension provides intellisense - when you start to type it pops up a context sensitive list of possible M Query functions which could apply to what you are typing.
This is handy for medium-weight development where you are typing in a substantial amount of code or making major changes and prefer to have some assistance with syntax. You will have to paste the code back in Power BI Advanced Editor to test it.

Power Query SDK for Visual Studio

 
For serious M Query writers, Visual Studio now has a Power Query SDK. This add-in for Visual Studio 2015 and Visual Studio 2017 allows developers to create Visual Studio projects using M Query (aka "Power Query). There are two types of projects available:
The Data Connector Project is intended for creating additional Power Query extensions, and the PQ file is for writing M Query queries like we've been working with.

Create a new PQ file project and paste in the M Query from your Power BI Advanced Editor. The PQ file projects can only handle one PQ file per project, so don't try to add a second PQ file. If the M Query contains a syntax error, Visual Studio highlights the error with the same red underlining as it does with any other programming language. It also will provide intellisense and bracket highlighting to make coding easier.

But wait...there's more! 

Visual studio also allows execution of the M query. To run click on the "Start" button (the usual debugging button). 
The first time you click on "Start", a dialog will pop up requesting credentials for the data source. Once credentials are set, close the Error dialog and click "Start" once more. The window will pop up again, but this time data should load. 
This will certainly save time since it won't be necessary to copy the M Query back into Power BI Advanced Editor until all modifications have been completed.

 That concludes Part Two of the M Query blog series. Join me in Part Three when I walk through a demonstration of writing M Query without using the Power BI Query Editor User Interface to auto-generate the M Query.


Tuesday, April 10, 2018

TSQL2SDAY 101: Essential SQL Server Tools

I've decided to jump onto the bandwagon and submit and article for this T-SQL Tuesday. This month, Jens Vestergaard (b|t) is hosting, and he's asked us to post about "The Essential SQL Server Tools in my Stack". These are the tools in addition to SSMS and Visual Studio Data Tools which we use for every day SQL activities.

In case you're new to T-SQL Tuesday, it is a blogging party hosted by a different person each month. It’s a creation of Adam Machanic (b|l|t), and it’s been going on for a very long time - we're currently on #101.

LadyRuna's Essential SQL Server Tools

As a consultant, I am often in the situation where I cannot make changes to the system I am using, so I frequently have to work with whatever they provide. Sometimes I'm lucky and they provide a few of my favorite tools, and other times not so much. Therefore, the tools I'm listing are the ones most frequently available to me in my consulting gigs.

Notepad ++


I hear you laughing, but think about it: you're tasked to create an SSIS package to import a flat file into your SQL server. Before you do anything in SSIS, you have to look a the file so you know whether the package will require any data transformations prior to loading the content into the SQL table.

If you open the file in Excel, it may automatically change the data types incorrectly (a good example is changing an account number that begins with 00 to an integer. That action removes the leading zeros, essentially modifying the account number's value), or it may reformat values in an undesirable format (changing phone number to scientific notation). If you open it in Notepad++, you will see exactly what the source system output and you will be able to accurately map all of the data correctly the first time. 

Notepad++ also offers context highlighting for various programming languages, a spell-checker, and prompts for frequently typed words (the list seems to grow the more you use it). Notepad++ highlights pairs of parenthesis, brackets, and braces; toggles comments; gracefully handles indents; and has fantastic searching capabilities. I like it enough that I find I use Notepad++ more than SSMS for many coding activities.

Poor Man's T-SQL Formatter


This is a free open-source downloadable T-SQL formatter available for SSMS, Visual Studio, and Notepad++ . It provides enough formatting options to satisfy most of the T-SQL formatting standards I've seen. If you haven't tried it yet, please download it and see for yourself.
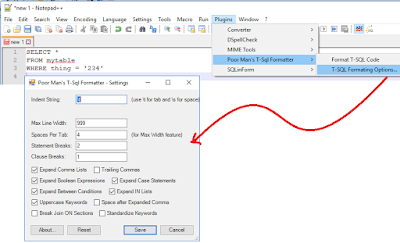
Poor Man's SQL Formatter in Notepad++

Poor SQL


This is a free, online SQL formatter. Since there is nothing to download or install, I use this to format my SQL when I'm working in an environment where I don't have access to any other formatter and I want my code to be formatted consistently and / or in compliance with the customer's style. I have not yet encountered a situation where this option was blocked.
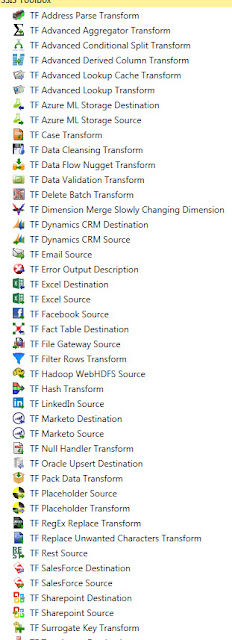
Task Factory


Some of the Task Factory Components
Until I started working for Pragmatic Works, I'd never used Task Factory when developing SSIS packages, but now that I do, I've found it actually makes working with SSIS pleasant.

Task Factory has over 60 SSIS components which are optimized to run faster than the native SSIS components. The Task Factory components handle many tasks which previously could only be handled using custom script components - allowing users to avoid the nightmare of debugging and rewriting script components for different environments.

BI xPress


Yet another Pragmatic Works product that I wish I knew about years ago is BI xPress. It includes auditing and notification frameworks which can easily be applied to any SSIS package to provide consistent and efficient auditing of SSIS package runs.

Once the auditing framework has been applied to a package, the SSIS Monitoring shows details about each run - including the values of variables at each component and, if the package is still running, which step it is currently running. I've found it's great for debugging packages that "worked on my machine" but aren't working properly in the SSISDB. I can see everything about the package in the SSIS Monitor in a view similar to what I'd see when running the package in Visual Studio.

There are more features to BI xPress than that, but in my experience those features are the ones I go to most often.


DOC xPress


One more Pragmatic Works product I wish the companies I worked for years ago had is DOC xPress. Its main function is to create documentation of SQL Server, SSAS, SSIS, SSRS, Excel, Oracle, and other database-based systems. It does this by pulling metadata about each of the objects and compiling it into a single cohesive unit. The documentation can be output into CHM help file, HTML, RTF or Word Documents.

I've found this is a fantastic device for learning about a new database system because all of the information is available in one spot. If a change occurs on a database that has been documented, after taking a new snapshot, the "before" version of the database can be compared to the "current" version to see what has changed.

DOC xPress even has a "lineage" feature which allows users to answer the question "Where did this field originate?". This means you can potentially pick a field in a table in the SSAS cube, find the SSIS package that loaded the cube, and trace that field back to the source database where it originated. Tracing the "lineage" with this tool is many times more efficient than the old fashioned method of getting a pre-dawn phone call about a process failure because someone made a change and didn't find all of the downstream effects of that change.


Tuesday, April 3, 2018

Power BI: M Query Basics (Part 1)

When you work with Power BI, you'll find that there are two languages to work with: DAX and M. Since most of the M query that you will regularly use is automagically (*that's not a real word, but it SHOULD be one) written by the Power BI user interface, the majority of Power BI developers focus on becoming proficient in DAX and really only look at M when they're stuck in a situation that requires that they learn it.

This M&M is a mashup of chocolate
 and pretzels
So, what exactly is M?

Some people think M is for "Microsoft".

Not quite.

According to the Microsoft Power Query M Reference,  "The Power Query M formula language is optimized for building highly flexible data mashup queries. It's a functional, case sensitive language similar to F#."

Generally speaking, most Power BI professionals settle upon saying that M is for 'Mashup'.

Now, when I heard that, the first thing I thought of was the orange pretzel M&M guy - he's a mashup of a favorite chocolate candy with pretzel and maybe some other stuff. Quite enjoyable, but not your standard or traditional M&M - just like M Query.

M is a functional script language with a step by step language structure used for data preparation. With it, one can transform or combine data sets, pivot, unpivot, split columns,  add or remove columns, remove unwanted characters, modify data types and perform data manipulations, among other things.

In Power BI, M Query can be automagically generated within its Query Editor user interface. The "Applied Steps" listing there summarizes all of the sequential M Query steps that have been applied to the current query, allowing users who aren't proficient in M Query to quickly view the changes made to the data set and to modify the changes without intimate knowledge of the M Query syntax.

Let's take a look at the structure of an M Query. You can access the M Query code from the Query Editor in Power BI by clicking on "Advanced Editor".

Here is an example of a Power BI M Query:

In Dark Blue, we have the "let" expression. This is equivalent to our SQL "CREATE PROCEDURE" declaration - it demarks the beginning of the series of steps used to transform the data into the final table to be used in Power BI.

Next, in Purple, we have the "in" expression. The Named Expression which follows "in" is the Output or final result of our M query. This defines the values that are seen in the grid view within the query editor.

In Aqua, we have the Named Expressions and variables. Each Step is a Named Expression which functions as a label to identify that step. Steps that are a single word may be declared by simply using the word alone, however, step names which contain spaces must be marked by using # and then enclosing the words within ". An example would be #"Renamed Columns"... Note that Source, which is only one word, does not need either the # or the " surrounding it.

In Green, we have the M Functions. These are the transformations performed upon the data set and the commands used to shape or mashup the data as needed by the final Power BI report.

In Black are the references to the previous steps. If you check each line, you will see that the Previous Step reference (in black) exactly matches the Named Expression (in Aqua) in the line above it. This helps demonstrate the step by step nature of the language - each successive step references and builds upon prior steps.

 There are a few other types within the M Query syntax, such as strings in Brick Red, data types and key words, but generally speaking the above summarizes the M Query syntax.

Resoved: Error Creating Storage Event Trigger in Azure Synapse

My client receives external files from a vendor and wants to ingest them into the Data Lake using the integration pipelines in Synapse (Syna...