OK, on to
M Query - the Second Part!
M Query Editor
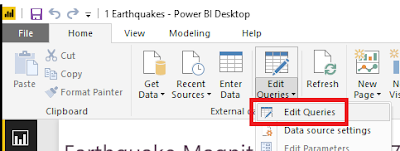
Open up a Power BI report in Power BI desktop. On the Home ribbon, click on the Edit Queries > Edit Queries to open up the Query Editor.

Once you have Advanced Editor open, you can edit the M Query associated to the selected query.
The first thing that you will notice about the built-in M Query editor is that it doesn't have any context highlighting, matching brackets are not highlighted, and syntax errors are extremely difficult to track down. Editing M query in here is not for the faint of heart - most of us are very thankful that the Query Editor user interface can auto-generate about 90% of all of the M Query code that will be needed.
Thankfully, it's not the only option.
M Extension for Notepad++
First up is the M Extension for Notepad++. I'm a big fan of Notepad++. It's lightweight, loads fast, and has context highlighting available for most programming languages. The official plug-in page for Notepad++ doesn't yet have a link for a fully completed extension, but you can visit Lars Schreiber's blog for instructions to set up your own M language highlighting (you only have to do it once, then it's there forever as a language choice in Notepad++).
The above screenshot shows the same "May Earthquakes" M Query except within Notepad++. Already you can see that pasting your M Query into Notepad++ makes it so much easier to understand and edit.
M Extension for Visual Studio Code
Hit install and it will be ready for use. What's really lovely about Visual Studio Code is that the M Query Extension provides intellisense - when you start to type it pops up a context sensitive list of possible M Query functions which could apply to what you are typing.
This is handy for medium-weight development where you are typing in a substantial amount of code or making major changes and prefer to have some assistance with syntax. You will have to paste the code back in Power BI Advanced Editor to test it.
Power Query SDK for Visual Studio
For serious M Query writers, Visual Studio now has a Power Query SDK. This add-in for Visual Studio 2015 and Visual Studio 2017 allows developers to create Visual Studio projects using M Query (aka "Power Query). There are two types of projects available:
The Data Connector Project is intended for creating additional Power Query extensions, and the PQ file is for writing M Query queries like we've been working with.
Create a new PQ file project and paste in the M Query from your Power BI Advanced Editor. The PQ file projects can only handle one PQ file per project, so don't try to add a second PQ file. If the M Query contains a syntax error, Visual Studio highlights the error with the same red underlining as it does with any other programming language. It also will provide intellisense and bracket highlighting to make coding easier.
But wait...there's more!
Visual studio also allows execution of the M query. To run click on the "Start" button (the usual debugging button).
The first time you click on "Start", a dialog will pop up requesting credentials for the data source. Once credentials are set, close the Error dialog and click "Start" once more. The window will pop up again, but this time data should load.
This will certainly save time since it won't be necessary to copy the M Query back into Power BI Advanced Editor until all modifications have been completed.


